My bloggy pals

Showing posts with label shabby chic. Show all posts

Monday, 18 February 2013

Peanuts anyone?


I save empty tins of all shapes, and they are getting in the way so I thought I would alter a couple. This is a smallish KP tin (other nuts are available lol) And I love playing with stuff as you know, so this was a good way to play with out buying anything new and getting rid  using some of my delightful paper stash. Isn't this very shabby chic style?  Some vintage lace and some yummy Prima flowers I have had for literally years. Anything Paris connected and I love to play all the more lol. So I hope you like my tin to store all sorts of stuff, from cotton wool balls to bits of make up or your sewing scissors & threads whatever you like grab a tin and get cracking lol.


Then I went all Retro, I adore this paper and I have used it many times in background shots of items as I have with the Parisian one above as well *swoons* just love all of these papers. Well, these have a real retro feel to them so I thought I would put a lovely photo of the 'Land-girls' who kept the bellies of the people going, during the war. Despite all the hardships that were going on look at the girls faces all smiling and getting on with it. I really love the philosophy of  'Keep Calm & carry  on', 'Make do & mend' etc Anyway I hope you liked my make do and mend storage tins from old peanut tins from Christmas, I love 'em. You can stuff it full with wooden spoons or other kitchen parafinalia, Just an idea anyway have a play. Love Dawn xx

Monday, 26 November 2012

Shabby Chic tag 'across the miles'


Hi, hope you're all well & safe. We are having some dreadful flooding here in the UK I am thinking of you. I was thinking of gifts, you know Christmas on it's way an all. Any way I thought it would be nice to make a tag or two, to put on some gifts to people I don't see because they're so far away, but I didn't want to go the traditional Christmas colours.


I decided to go all Shabby, I love this look so much. I found some fabby papers of vintage maps A5 size and this isn't a shop I would think I would get this kind of thing, but I will be looking much more closely Here in the future. I hope this gives a little inspiration, and reminds us that our family and friends are never too far for us to show them love, be safe. Dxx

Thursday, 2 June 2011

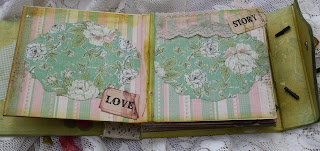
Shabby chic book.


Morning bloggers. I was very busy on this and I am working on something else that's going to take some time to complete, so I hope you won't think bad of me if I am not around much. I was however, please with this very much. It may have taken time, but time well spent I think you will agree. This will be added to the items for sale in my folksy shop I hope you will take time to look HERE.


Here are some close ups of the inside of the book. you can use this for several ideas. As a photo album, to give as a gift to a special some one. Or you can fill the spaces with your thoughts or quotes you like, you can even use this as a base for a personal scrap book, you choose. I have given it a shabby chic/vintage look which is very popular and of course you know I love these types of elements.


Even the back looks good. Imagine this on a coffee table, it just beg's to be picked up and be browsed through, a nice conversational piece to. Now I hope to upload some photos of the kittens soon just 3wks old now, they have their eyes open and they are just lovely balls of fluffy yumminess bless. There is also A challenge I really want to play before Monday, and James is coming for a long weekend from today so I am really trying to push a lot in by the end of the week (fingers crossed) ha ha. And welcome to the new followers Romance of roses, Two crazy crafters & Lisa M Griffin I have made it to over 250 followers (who would of thought) So I will also sort out some small give away soon for this achievement. Love Dawn xx

Saturday, 9 April 2011

Furniture transformations


Hello hello and how are you this wonderful day. I said I would be giving you some peaks and here is your first. I showed this photo ages ago in my WOYWW one week. Now silly me forgot to take a photo of the before for two things I was going to change over the last couple of days (while the weather is warm & dry) so you will have to use your imagination a bit here. Concentrate on the draws OK.


This is the after! My hubby sanded it all for me and got rid of the varnish on the mahogany veneer. I was surprised it was actual mahogany :-0 any way I then gave a couple of coats of a metallic vintage gold paint. After that a couple of coats of heritage paint, oh so very yummy called 'Crochet' it's not white it's kind of green but not lol but I love it. Any way after that dried I got some rough sand paper and sanded bits to make it look a bit shabby. Now all my lovely arty stuff is back in there but this will be in the front room make over I think, although I did do another one with hubby's help today and that may go in there instead my be I will let you choose I may get that up loaded over the week end as my darling James will be here all week end. I can't tell you how excited I am about this new venture changing my front room but it's going to take a few months at least, I hope you like these posts but of course, but I will be putting future posting of this transformation on my NEW PAGE 'Room Makeover'  all you have to do is hit the tab at the top of the page. There is also a NEW PAGE for some 'Freebies' I am still doing swaps journalling and tags along with whatever else comes into my mind to create ;0) here on this page so worry not lol.I would also like to say thank you and welcome to my new followers Lisa & Linda and all of your beautiful and encouraging comments. I read every single one. Love Dawn xx

Tuesday, 8 February 2011

Baby Vintage (look) box


Hello, Well It's finally finished, and I am happy with it. I tried all sorts before I came to this finished product. My cousin (Helen) had her first child last week A little boy who they have named Leo William. oh and what a beautiful boy he is. They didn't know the sex as they decided to have a surprise. I was going to go all pink if it was a girl, but as he's a boy I really didn't want to do blue it just didn't look right and I wanted a Victorian vintage shabby kind of feel with out it looking tacky (I know) that's why it took months to do!


Here's the outside, this was one of those bare pine boxes I used gesso to cover it all (a couple of coats) then I used Laura Ashley paint 'Creamware' isn't it lovely Added some wonderful brade trim some stamps and clear embossed them. My gold pen to colour the hinges and fastening. On the top I used some vintage lace and a Victorian photo of a baby boy and also edged it with some pearl & ribbon trim to frame the photo, it just looked too bare on it's own.


Finally in side I used some wonderful paper so lovely from Graphic 45 I love the sheets I bought (defo have the strokeability factor ha ha) Know I just need to think what to put in side. ( a voucher for the baby at least) but I wanted to put some baby things in of a vintage nature like an old nappy pin with blue enamel top (for a boy) any other suggestions I am really struggling here HELP! as I really want to get this off in the post by the end of next week. I really hope you like my baby box. Have a lovely Tuesday. Love Dawn xx 

Sunday, 5 September 2010

Shabby Chic letter R


Hello, how is your weekend going? I hope your all well. I see I am almost at 200 followers gosh, I will have to start thinking about putting a little candy together. I love all my followers each one of you give me confidence you may not all comment but I continually grow and I hope that is because you like popping back and seeing what I am up to ;0)


So I have made another letter ;0) and  thought I would go all shabby. What theme should I do next? any suggestions? Well I got some lovely paint and covered it in metallic gold then a lovely off white pink colour it crackled a little and I sanded a little to see some of the gold underneath, then I went a head and added lots of bit's n bobs.


I really like these frames, how versatile they are. you can paint them cover them in DEP and all sorts of things as in my last post. I really enjoyed making the lace flower, but I can't be sure if it's a little too much? I haven't seen any challenges that I can fit this in to let me know if you see one. I was rather lucky yesterday my letter A fit in to lots ;0) well have a wonderful Sunday, I Love the Sabbath day, thanks for your comments and visits. Love Dawn xx


Items Used:- Ornamental frames, Distress Glitter & ticket Tim Holtz. White frame, Melissa Frances. Card board frame & Leaf Papermania. Rub ons, Basic Grey. Stickers, Violette Paints, Crown and Ranger Dabber. Lace, ribbon and button Stash.

Thursday, 15 July 2010

Shabby Chic and news of Dude


Hi ya. Oh my, we had a great thunderstorm last night! and the rain has only just stopped (well about half an hour ago) and the sun is shining brightly. Don't you just love the English weather? I love a good thunderstorm. Looky here I made a card. I don 't feel as though I have made a card in simply ages. I hope you like it. I am going to enter this in to Linda's Monday Tim Holtz challenge click my side bar for more info or click on Linda's name.


Now as you know I love a close up ;0) so here you can see the sun streaming through so  got great picks today. Thought I was going to have to use my flash but no! So, how did I make this card? I have used Tim's Die Cuts on my Cuttle bug to cut out some copper metal shapes, but for more info of how to get the yummy texture look on pg 43 of Tim's Compendium of Curiosities. The rest I think is self explanatory some vintage music sheets aged up even more, a pretty wooden dove covered in fabric, some lovely DP distressed with ink, and a beautiful vintage button to finish this card off in the centre of some delish aged ribbon. Hope you like it, oh and another follower has joined our merry band welcome, you have made me smile today. 


And as I am a super proud mummy to Dude I thought I would take some photos and share them with you, he is now in the side bar too! (if you click his photo on the side bar you will be taken to a list of shelters in tameside where animals need our help, there will be a local animal shelter near you  to) 

He has been with us just over a week now and well and truly made him self at home. Now hubby was never a big cat lover. I mean he would never harm one but much preferred dogs, I am sure you know what I meen.  Dude has warmed him up so much lol he is almost dog like in some ways, he sits at your feet when your cooking in the kitchen (like Dita used too) almost as if he's waiting for scraps, but never takes any thing. And when we sit in the front room to watch some TV, he walks in and then just flops down on his side just like a dog would. Hubby, also gets to play with him. Dude loves him too. But some times, just sometimes. I get the most loving cuddles as he jumps up, sits on my lap and he rubs his face against my cheek. Hunny is a little older (6yrs) and will curl up all adorable like and snooze bless her, but is coming round to playing more and seeking attention. I wonder why? lol so just a quick up date on the big fella for you. Love Dawn xx

Saturday, 5 June 2010

Shabby Chic


Well after making one card yesterday I got in the mood and made this. I love the shabby chic style too. What's a girl to do when she like so many different things? Well simple, buy more stash ha ha.  Any who I thought I would play with The Shabby Tea Room well couldn't have a more fitting card could I? lol they are wanting 'Heart' this week! and while I am at it, I thought I would play with Tuesday Taggers they would like 'Texture' and I feel I have managed this criteria as well They are also being sponsored by Tanda Stamps and I popped by to have a look and gosh they have some grat stamps too (fingers crossed). And why not play with Sir Stampalot for a 2nd time this month, and they want 'Punches' in the month of June (not literal fisty cuffs I hasten to add lol).


Want a better look? here's a close up! I covered some plain chip board with CS and DP and then inked them up and added some gems & pearls don't you just adore the ribbon? Oh heaven for Esty buys, but it cost more in postage than it did for the ribbon! so a real luxury but it was very worth it I hope you think so too!


Mmmm so how did I make it? well it took a while but I think it was worth it. I love the feel of this card (no idea who it's for though ha ha ) these days I tend only to make a card when I need one as I have 100s (I do not exaggerate) and I still haven't got round to doing a craft fair yet! And I would just hate to give them away at £1 each as you don't seem to get alot these days for this kind of stuff and I would rather keep them. Any way I cot some CS then added some DPs then some more CS stamped it with a lovely script stamp (delish) The I got the sewing machine out and added the vintage lace. Then i got the cuttle Bug out and made a frame and dry embossed it. phew! I told you it took a while to make lol


Well I then stuck it all together and took some photos in the most beautiful sunshine, it's so sunny I hope you can see the cards detail ok. I hope your having  safe fun in the sun, and you enjoyed my card, don't forget to pop around to the DTs they do work hard to give inspiration in these challenges don't they? and if you can leave a comment and I can hopefully get round to your blog too! Love Dawn xx


Items Used:- Stamp, Stampin Up (SU) french script. Design Papers (DPs) Mellisa Frances & Crafty Individuals. Card stock SU Ribbon http://www.etsy.com/shop/MemrieMare if you would like to have a looksey. Cuttlebug EF & Die cut, Nesties. Punch, Marther Stewart.

Saturday, 3 April 2010

Shabby Note Book


Hello my wonderful crafty on line companions, I hope you are having a wonderful Easter. I managed to get some play time over the last couple of days. This project was wonderful fun and will help me store my new ideas. I often wake up or can't sleep due to things spinning around in my head so I thought I would make a note book well alter a cheep Asda note book ;0). I did see a challenge some where for fabric but can't find it now doh! any way I will enter this for SCD Which is something  with a 'W' White in this case. Alphabet challenge is 'White' this week as well. The Sunday stampers their theme is 'Lace' and Simon Says is 'distressing'. must see if I can find the fabric one again lol


I started with a cheap note book from Asda, then some DP I watered some WHITE gesso down then painted the DP giving a nice distressed/shabby look. I also used the same method with some paper flowers and left them to dry over night. I liked the transfer TT so much on GSC (see previous post or GSC TT Links) I thought I would have another go with an image I am not sure where from? sorry let me know if you know and I will give credit to them. I got my machine out again for the second time this week lol and stiched the transfer to some linen tatted the edges up again and used very wabbly stiching (on purpose lol).


I popped some lace on from my stash and added some roses in a nice cluster. I also stubtly stamped over the gesso in various places butterflys & swirls (there must be some more challenges I can add this to;0) I really do hope you get chance to think about this week end what it really means to have the atonement of Jesus Christ in our lives. Be safe, love Dawn xx

Items Used:- DP K&Co Stamps SU. Flowers various. Lace, linen Stash. Tim Holtz Idea-ology ornate plate.

Saturday, 13 March 2010

Shabby Chic

Hello Blog land & my crafty chums. I have been busy! not to busy to pop buy your blogs and comment. I have really seen some great work this week, day after day I really admire you guys. No, too busy to post something of my own. Had Grand son  for a couple of days and always too exausted for a day or two after. What do you think of this little beauty? cute isn't it. I saw it in a charity shop for £2 and thought I could do something with this.

So I sanded it down some, all over! I had plans for this little one ;0)
I even did the inside as well as the out side can you see? looking very distressed now and my arms were aching (can you imagine full size?)


I covered it in gesso then gold paint from crown then some crackle glaze then emulsion (white) drying took for ever! A watched pot never boils and so on. But sadly it didn't work as I had hoped the glaze just didn't do what I wanted. (what it said it would do) any way re-painted in the emulsion again, then got a gold ink pad and brushed it all over the dry paint. Now because it didn't work very well the paint was quite lumpy in places and crackled in others so because of the texture draging the ink pad across worked quite well (I think!)


The top worked the best can you see the crackle it's a shame it didn't do this all over (so it must be my technique) if it worked in one place., it should work all over. I am sure Tim's crackle paint would work (but such a small pot for £5.99 and this is quite a large area)  Also, I was doing this because I was testing some products. Really you should be able to see the gold from the base coat but as I said it didn't work so the gold you can see is from ink pad.


One final photo to give you a perspective of the size lol isn't it cute? I have also been buying some solid full size furniture (yep this was a test run, that's why I had to try certain products) and now my crafty stash is in beautiful solid wood furniture (all from the charity shop) If all goes acording to plan I will show and tell. ;0) so now you know why I have been so busy lol thanx for looking and any comments you make be back soon I really can't wait to hear what you think of this project and the fact I will be trying the Full size versions, it's still crafty isn't it, I do hope you will pop back to find out. And I will do some more of the usual crafty stuff I normally do lol.  Love Dawn xx

LinkWithin

Blog Widget by LinkWithin